Wednesday, February 27, 2013

Italian Frybread or Mazza Fame

One of my husband’s fondest memories is his beloved Abruzzesse aunt and grandmother making mazza fame.  I had never heard of it before I met him – it was told to me that it meant “kill hunger.”  (My best guess is that it comes from the Italian verb ammazzare.) 
Although the Sicilians also have a fried pizza, I have never heard of mazza fame anywhere else. But the joys of fried dough are universal and decided to revisit it when my own kids suddenly got very picky at dinnertime.
The pizza dough I like best is Guy Fieri’s and I've tried a bunch of them. It is not a brilliant recipe – there is no semolina or fancy rises.  But it works and works well. Rises great. You can use all purpose crap flour. Important, considering I have to double it to work in this house.
One thing, you will use a LOT of yeast.  Those little envelopes only hold about one teaspoon and a half.  Go invest in a jar of yeast for the fridge.  And before you make the dough, you had better make sure that yeast proofs. 
 I like to microwave the water for a minute or so before adding sugar and yeast.   And then I walk away for awhile.
Mix it up with the dough hook attachment, place it in a lightly oiled bowl and cover with plastic wrap.  Leave it for an hour or so in the warmest place in the house.  I usually put it upstairs in one of our bedrooms.

And then voila!  Look at that nice rise.

I’m making a sauce for you today, because I’m feeling fancy.  Mazza fame is FINE, more than FINE, with jarred sauce.  But this is some garlic, onions, celery and grated carrots simmering in oil.  I’ll throw in some wine, some basil and Citterio diced pancetta.

Diced pancetta is one of my favorite secret ingredients, found in the packaged cold cut section of ShopRite.  They sell diced pancetta and prosciutto.  I keep them in my freezer so I can always throw in a few tablespoons.  (My go-to easy pasta sauce is this stuff, onions, garlic nicely sautéed and brown, throw in some frozen peas and shit-ton of black pepper.)  My second favorite ingredient (which is easily added to everything) is vermouth.  Get a good bottle of white vermouth (I prefer NoillyPrat) and with a 3:1 ratio of vermouth to water – you have a ready-to-use wine substitute for cooking.  Won’t go bad and always at the ready.
Anyhoo, after everything browns nicely, add a can of tomatoes and let that cook down into oblivion.  No little cans of tomato paste.  Never. Unless you want to everything to taste like tin and bullshit.

FYI, this is not The Sauce.  This is a quickie.  The Sauce is a full scale eight hour ragu and requires many different frightening animal parts.  I’ll cover that in a future post.
So our dough is ready, our pastry board is out and let’s roll. This is a super sticky dough, you will need lots of additional flour.
Here are the two things to remember:  roll it THIN and put them into an inch or so of oil that has to be CRAZY HOT.  Hotter than you think.  I actually put in my candy thermometer into the oil and things starting getting good over 350 degrees.  Which is why I use canola, because of the higher flashpoint.  And you'll want a saucepan with deep sides, this stuff is dangerous.
My rounds are about 6-7" diameter and should PUFF and bubble when they hit the oil. 

You flip that over and continue until they are all lovely and golden.  Set them on paper towels and sprinkle with sea salt.

Top with some sauce and lot of grated cheese.  And your children won’t eat anything from the pizza parlor anymore either!

Sunday, February 24, 2013

Sunday Morning Buttermilk Biscuits

It's Sunday morning, and in this house, that means biscuits. There's a million ways to make them and a million ways to serve them, but I'm going to share how they are properly made and eaten in Texas.

Keeping the ingredients simple is key to making an authentic Texas biscuit. Adding cheese, rosemary or any other embellishment is optional and entirely your choice, but it won't be what you've come here looking for. Food preparation in rural areas is by definition and by necessity a "use what you have" and "don't waste anything" situation.

One thing you will notice is that shortening is king in making breads and pastries in Texas. Butter is tasty, but in my childhood, it was considered just too darn expensive to use as in ingredient. It's used for flavor once the food is done. Shortening also yields a more tender, flaky result than butter. It's no contest. Save the butter for after.

Let's get mixing. You'll need:

2 cups all-purpose flour
1 tablespoon baking powder
1/2 teaspoon baking soda
1 teaspoon salt
1/2 cup shortening (yes, you may use butter-flavored)
1 cup buttermilk (low fat is fine)

Preheat oven to 450 degrees.

 
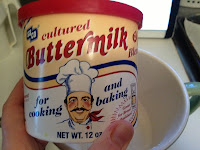
Cultured buttermilk powder
Shhhhhh!
Sift all dry ingredients into a bowl. Okay, here's my dirty little secret. When I was a kid, we had buttermilk handy all the time. My parents drank it. Yech. If, like me, you don't happen to have nasty spoiled milk in your fridge, keep a can of this stuff around. Substitute the buttermilk for 1/4 cup of powdered buttermilk and 1 cup water. Sift the powder in with the dry ingredients and don't add the water until the recipe calls for liquids.
Like so.

Cut in the shortening with a fork or pastry blender (for Pete's sake, put away the Cuisinart for once) until it's pretty integrated and the mixture looks mealy and pebbly.

Add the liquid at this point and mix with a fork. You'll get a sticky dough that you will want to turn out on to a well-floured board and knead lightly, maybe five or six times. This is a quick bread, be gentle.

Ahhhh. There we are. Take your grandmother's wooden rolling pin or your own two hands and roll or pat the dough out to 1/2 inch thickness. Some people prefer a flatter biscuit, so I rolled some out to 1/4 inch to compare. I prefer my biscuits high and proud. 

Cut out with a biscuit cutter or a round cookie cutter. Don't get cute and use a mason jar. Your dough will get stuck, and yes, we did have a biscuit cutter on the farm. We weren't heathens.

Cut close and don't twist. Place on a lightly greased baking sheet. Some people like to place them clustered so they're touching to get a softer-sided biscuit. I have no preference. Take the small scrap of dough that is left and gently shape into your last biscuit. Don't work it too hard or it will be tough.

Bake for 10-12 minutes, depending on the personality of your oven. The number of biscuits you get depends entirely on how thick or thin you roll them. But this should yield 6-9.

If you could only smell them.

Oh, my my. See how flaky and light? See that split right down the center? That happens naturally if you don't over knead.

Now add the butter. We used to pour syrup or milk gravy* over them, but I suppose you can add jam or whatever your preference is.

This is a soft, moist, flaky biscuit with a sturdy bottom meant to "sop up" whatever is poured on top.

Hey, y'all. Come on. Breakfast is ready.


*NOTE: Milk gravy, well, that's another day.


Saturday, February 16, 2013

Dulce de Leche Cupcakes

My first successful attempt at super-fancy cupcakes were these Dulce de Leche cupcakes.  It wasn't my recipe, no -- I happened to find it on a website called Sydney's Kitchen.  Which is no longer operating. 

But it's still a great recipe, I just wish I could credit it.  But to save it for posterity, here it is:


Dulce de Leche Cupcakes
(Sydney, I'm sorry I can't credit you better for these)

These are the cupcakes that schooled me in the art of hand mixing.  Don't overmix these.  Once the liquid and flour stuff come together, I mix as gently as possible.  Otherwise they turn into muffins.


For the Cupcakes

3 1/4 cups flour
1 1/2 teaspoons baking powder
1 1/2 teaspoons baking soda
3/4 cup butter, softened
1 cup brown sugar
1/2 cup granulated sugar
1 teaspoon vanilla
4 large eggs
1 1/2 cup buttermilk

To Prepare thecupcakes

1. Place the oven racks in thecenter and upper third of the oven and preheat to 350 F.  Line two cupcakepans with paper or foil liners.  Set aside.

2. In the bowl of an electric stand mixerfitted with a paddle attachment, add butter and sugars.  Beat on mediumspeed until fluffy and pale brown, about 3 minutes.

3. Scrape down the sides of the bowl and addone egg.  Beat on medium speed for one minute.  Add the remainingeggs, one at a time, beating for one minute between each addition.  Beatin vanilla.

4. In a medium bowl, whisk together flour,baking powder and baking soda.  Add half of the flour mixture to the eggand butter mixture.  Beat on low speed HAND MIX WITH GREAT CARE TOGETHER and slowly drizzle in thebuttermilk .  Beat until just incorporated.

5. Scrape down the bowl and add the remainingdry ingredients.  Beat on low speed FOLD TOGETHER until just incorporated.  Try not to over mix the mixture.

Divide the batter between theprepared cupcake pans, filling each liner about two thirds full.  Bake for18 to 20 minutes or until a cake tester inserted in the center of one of thecakes comes out clean.  Allow to cool slightly  in the cupcake pansbefore removing to a wire rack to cool completely.  Cupcakes should becompletely cooled before frosting.

For the Frosting

1/2 cup butter, softened
8 oz. (1 package) cream cheese,softened
3/4 cup dulce de leche, plus morefor drizzling
2 to 3 cups powdered sugar

To Prepare theFrosting

6. Place cream cheese in the bowl of anelectric stand mixer.  Beat on medium speed for about 30 seconds, untilvery soft and pliable.

7. Scrape down the sides of the bowl and addthe butter and dulce de leche.  Beat on medium speed until wellincorporated.

8. Stop the mixer and add the salt andpowdered sugar.  Beat on medium speed for about 3 minutes, until fluffyand lighter in color.  Generously spoon frosting on top of cupcakes, oruse a large 1 M Wiltonstar tip to pipe on frosting.

To finish the cupcakes, heat afew spoonfuls of dulce de leche in a small pot over low heat until justpourable.  Drizzle it over the cupcakes and top with a fewsprinkles.  You could add a few sprinkles of fine sea salt if you’refeeling fancy.

Blogging tips